Description:
WAIDPS is an open source
wireless swissknife written in Python and work on Linux environment. This is a
multipurpose tools designed for audit (penetration testing) networks, detect
wireless intrusion (WEP/WPA/WPS attacks) and also intrusion prevention
(stopping station from associating to access point). Apart from these, it will
harvest all WiFi information in the surrounding and store in databases. This
will be useful when it comes to auditing a network if the access point is ‘MAC
filtered’ or ‘hidden SSID’ and there isn’t any existing client at that moment.
WAIDS may be useful to
penetration testers, wireless trainers, law enforcement agencies and those who
is interested to know more about wireless auditing and protection. The
primarily purpose for this script is to detect intrusion. Once wireless detect
is found, it display on screen and also log to file on the attack. Additional
features are added to current script where previous WIDS does not have are :
·
automatically
save the attack packets into a file
·
interactive mode
where users are allow to perform many functions
·
allow user to
analyse captured packets
·
load previously
saved pcap file or any other pcap file to be examine
·
customizing
filters
·
customize
detection threshold (sensitivity of IDS in detection)
At present, WAIDS is able to
detect the following wireless attacks and will subsequently add other detection
found in the previous WIDS.
·
Association /
Authentication flooding
·
Detect mass
deauthentication which may indicate a possible WPA attack for handshake
·
Detect possible
WEP attack using the ARP request replay method
·
Detect possible
WEP attack using chopchop method
·
Detect possible
WPS pin bruteforce attack by Reaver, Bully, etc.
·
Detection of
Evil-Twin
·
Detection of
Rogue Access Point
The whole structure of the
Wireless Auditing, Intrusion Detection & Prevention System will comprise of
Harvesting WiFi Information [Done]
Intrusion Detection [Partially Done]
Intrusion Prevention [Partially Done]
Auditing (Testing network) [Coming Soon]
Other additional item
include analyzing of packets, display of captured dump, display network
barchart and much more.
Requirements
No special equipment is
required to use this script as long as you have the following :
1. Root access (admin)
2. Wireless interface which
is capable of monitoring and injection
3. Python 2.7 installed
4. Aircrack-NG suite
installed
5. TShark installed
6 TCPDump installed
7 Mergecap installed (for
joining pcap files)
8 xterm installed
Note: Application 3 - 8 are
already pre-installed in Backtrack and Kali Linux. Save the hassles by running on Kali-Linux.
Download / Installation
Save the file 'waidps.py' to
your Linux Desktop or any directory you like. For my case, i saved it on my
desktop and enter the following in the terminal console.
- cd
Desktop/
- chmod
+x waidps.py
- ./waidpy.py
Once installation is completed,
you may wish to delete the file where you have initially saved as the following
had be created:
Directory : ~/SYWorks/
Directory : ~/SYWorks/WAIDPS/ (Working
directory – Scripts and config files)
Directory : ~/SYWorks/ WAIDPS
/tmp (For
storing temporary files)
Directory : ~/SYWorks/WAIDPS/Database (For storing MAC-OUI and
database files)
Directory : ~/SYWorks/WAIDPS/Saved (For storing pcap
files)
Directory : ~/SYWorks/WAIDPS/Captured/Attack (Storing automatically saved attack
pcap files)
Directory : ~/SYWorks/WAIDPS/Captured/Monitoring (Storing automatically saved monitoring MAC
pcap files)
File : ~/SYWorks/ WAIDPS /waidpy.py (Main script)
File : ~/SYWorks/ WAIDPS /stn.deauth.py (IPS script)
File : ~/usr/sbin/waidpy.py
Note :
·
WAIPDS can
download the ‘mac-oui.db’ directly from Github as long as there is internet
connection
·
User need to
enter a password for encryption of important database and remote
transmitting/receiving of encrypted data (future)
Once the script is started,
it will attempt to detect the wireless interfaces installed in user system and
will use the default wireless interface if only one wireless card is installed.
If there are multiple
wireless interfaces detected, application will prompt user for action.
User can also is the
commandline parameter ‘-i’ to specify the interface to use.
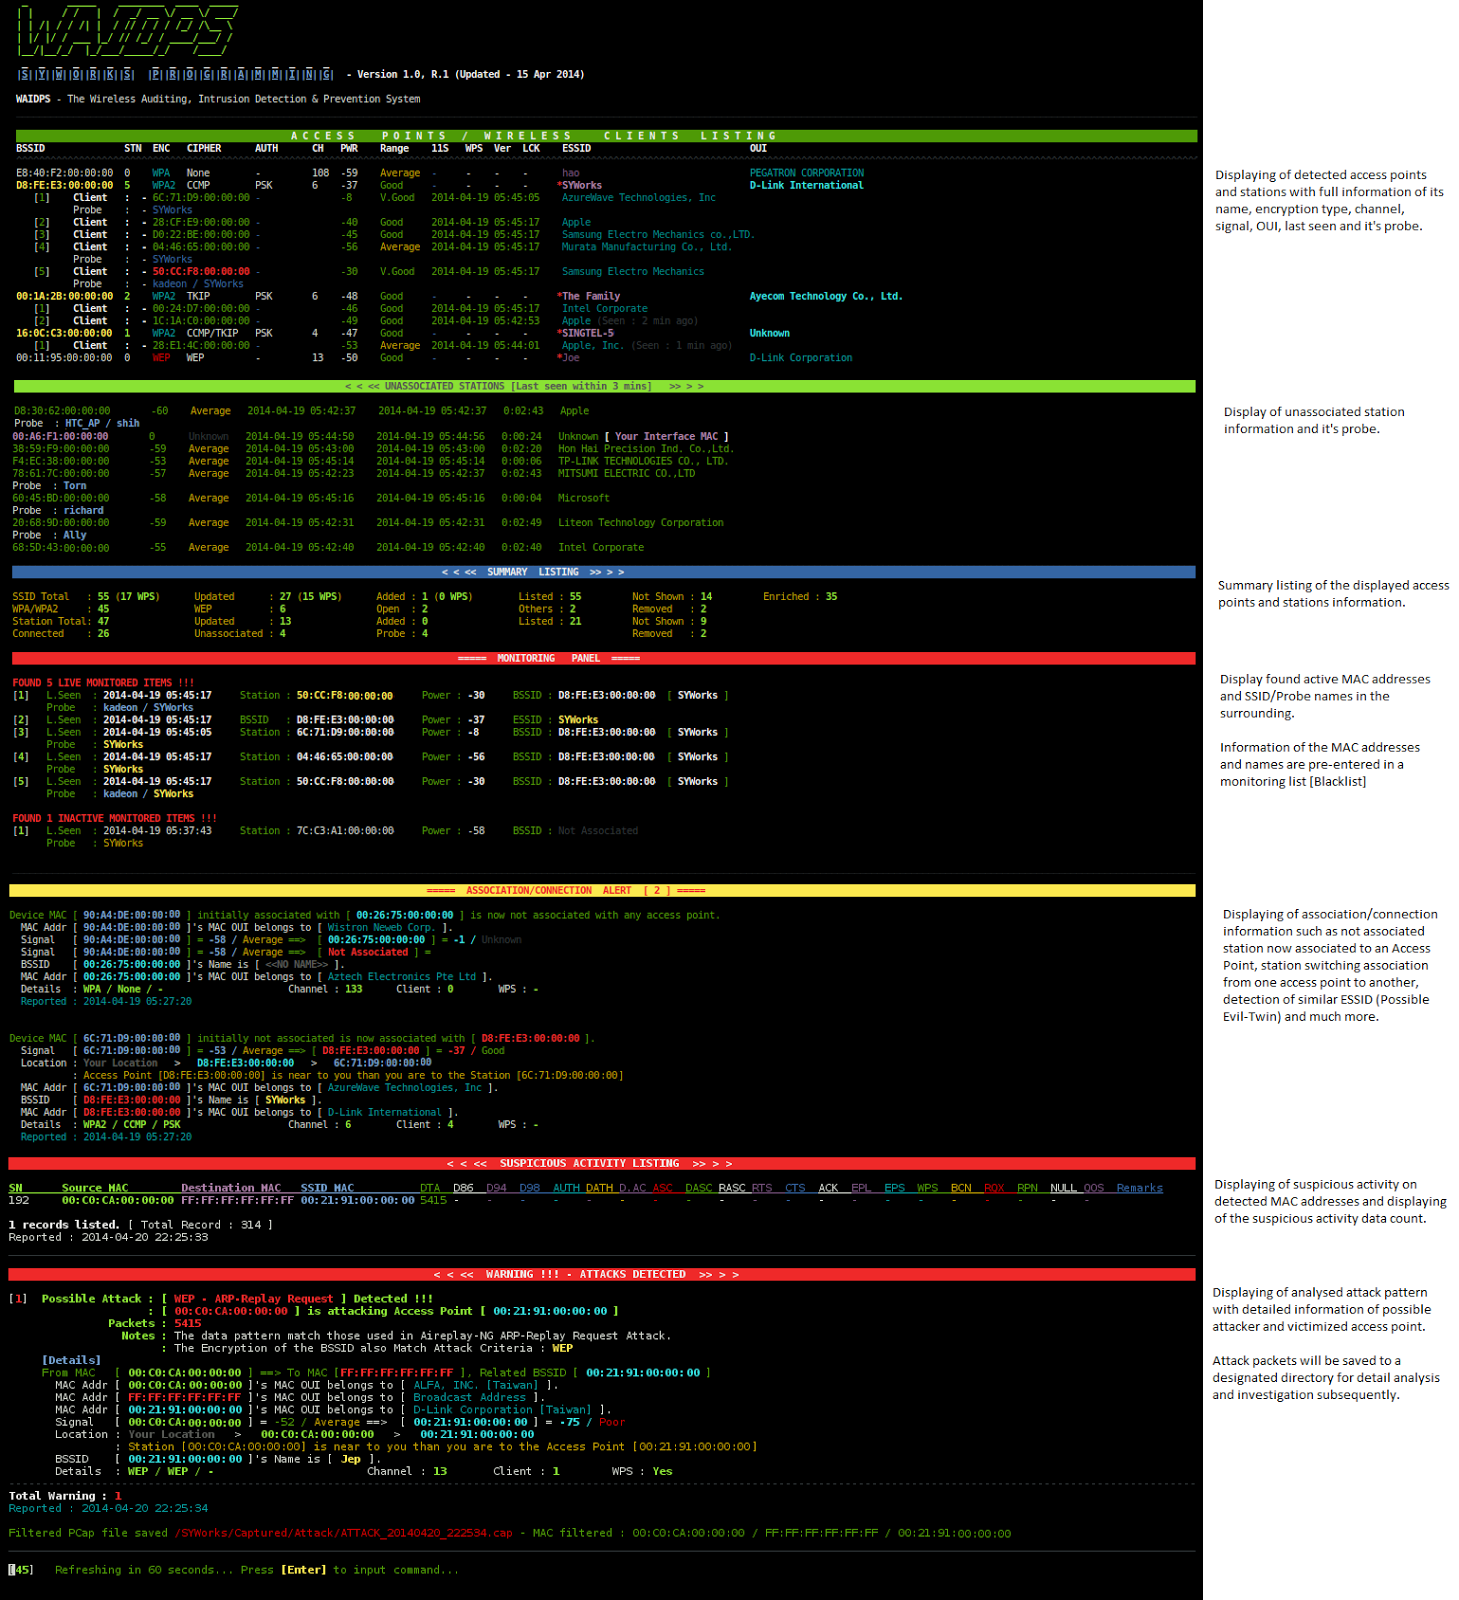
Structure of WAIDS’ Display
Before starting with the
detail description of the whole application, WAIDS display structures are separated
in several parts. For better understanding, the structures are as below.
WiFi-Harvesting Module
- Collecting/Storing of Access
Points/Stations details and the relationship with each other. [Access Points / Wireless Clients Listing]
- Displaying of unassociated station
information and its probe [Unassociated
Stations]
- Allowing user to enter MAC addresses /
Names to be monitored [Monitoring Panel]
- Association of stations to access point,
station switch from one access point to another, station acting as both a
wireless client and access point, etc [Association/Connection
Alert]
Intrusion Detection
-
Capture/Analyzing of packets
- Displaying of Station/Access Point MAC
addresses and detected suspicious data count [Suspicious Activity Listing]
- Displaying of analysed WEP/WPA/WPS attack
pattern and its detail [Attack Detected]
Below is an example of the
displaying structure.
Note : User can also choose
to display or hide the some of the selected display.
Command Selection Menu
At any one time during the
waiting process, user can press [Enter]
to enter into the [Command Selection
Menu] for other setting, functions and tools.
B – About Application
C – Application
Configuration
·
0/D – Change
Regulatory Domain
·
1/R – Refreshing rate of information
·
2/T – Time before removing AP/Station
·
3/H – Hide inactive Access Point/Station
·
4/B – Beep if alert found
·
5/S – Sensitivity of IDS
·
6/A – Save PCap when Attack detected
·
7/M – Save PCap
when Monitored MAC/Name seen
D – Output Display
·
0/H – Hide both
Access Points & Stations Listing Display
·
1/A – Display
Access Point Listing Only
·
2/S – Display
Stations Listing Only
·
3/B – Display
Both Access Points & Stations Listing (Separated View)
·
4/P – Advanced
View with Probes Request (Merging associated Stations with Access Points)
·
5/O – Advanced
View without probing request (Merging associated Stations with Access Points)
·
6/C – Display
one time bar chart of Access Points information
·
7/C – Hide/Show
Association/Connection Alert (Coming soon)
·
8/U – Hide/Show
Suspicious Activity Listing Alert (Coming soon)
·
9/I – Hide/Show
Intrusion Detection/Attack Alert (Coming soon)
F – Filter Network Display
·
1/A – Access
Point
o 1/E - Encryption Type
o 2/S – Signal
Range
o 3/C – Channel
o 4/N – Client
o 5/W – WPS
o 9/X – Clear Filter
·
2/S –
Station/Client
o 1/P - Probes
o 2/S – Signal
Range
o 3/A – Associated Station
o 4/U – Unassociated Station
o 9/X – Clear Filter
·
3/U-Unassociated
Station
o 1/P - Probes
o 2/S – Signal
Range
o 9/X – Clear Filter
H - History Logs
·
1/C – Connection
Cautious Log
·
2/S – Display
Suspicious Activity Listing
·
3/A – Display
Attack Log
·
4/.L – Display
Combination Logs (Combination of logs from 1,2,3)
L – Lookup MAC/Name Detail
(Searching for detail stored in database)
·
1/M – MAC
Address
·
2/N – Names of
Access Point / Probes
M – Monitoring MAC Addr /
Names (Show Alert when the specified MAC/Name became active)
·
1/M – MAC
Address
·
2/N – Names of
Access Point / Probes
·
9/C – Clear all
Monitoring Items
O – Operation Options
·
0/R – Shutdown
all interfaces and Restart again
·
1/P – Probe
Access Point Name
·
2/N – Refresh
Now
·
3/S – Restart
Application (All active listing will be cleared)
·
4/T – Restore
all setting (All configuration will be reset, application will restart)
A – Auditing (Penetration
Testing of WEP/WPA/WPS Encrypted Network)
Coming Soon
I – Interactive Mode (Packet
Analysis)
·
Go into the
command prompt and type [Help] to display options. Tons of options available
for advance user examine and analyzing captured packets and add in customized
attack pattern themselves if they know how to script.
P – Intrusion Prevention
(Still in testing & scripting)
·
Basically
sending deauthentication signal to specified MAC address stopping attacker from
associating to access point
X – Exit Application
WiFi-Harvesting
Module
The WiFi Harvesting module
will sniff the surrounding traffic using airodump-ng, iwlist and wash for
network information such as station mac address, probe, access point mac, name,
encryption type, channel, signal strength, bitrate, oui and WPS information. With
all the information gathered, it will then stored in databases for easier
lookup of MAC addresses / names which will proof useful in term of MAC filtered
/ Hidden SSID access point or as an evidence that a specific station have
associated to which access point. It can be done by using the built-in Lookup
function.
Displays
In term of displaying/hiding
of live captured access points and stations information, WAIDPS provided the
follow selection basing on user preference and requirement.
·
Option 1 - Access
Point Only
·
Option 2 –
Station Only
·
Option 3 –
Access Point and Station (Each in separated view)
·
Option 4 –
Access Point with Station (All in one – Easier viewing of which station is
associated to which AP) – Default
·
Option 5 –
Similar to option 4 but without displaying of Probe name.
·
Option 0 – Hide
both Access Points & Stations display
All these setting can be
changed by press [Enter] to interrupt and entering user option menu while
application is scanning the environment. After entering into the [Command Selection Menu], select “D” for output display and enter the
choice from 0 to 5 to switch between views.
Option 4 - [Access Point with Station (All in one)]
The default display view
will be Option 4, ie. displaying both Access Point/Clients/Probes all together.
It is consider the best and advanced view among the 5 display options.
Note : A bold yellow on BSSID indicate that there are
stations associated to the Access Point.
A red asterisk beside the ESSID means that the Access
Point was enriched with IWList.
Different encryption type is represent by different color
(Open- Yellow, WEP-Red, Cyan-WPA/WPA2)
Station are in green color and probe name are in blue.
Option 1 - Access Point Only
This option only display
Access Point information and hide all stations display. Simply press [Enter] to enter [Command Selection Menu] and select ‘D’ followed by ‘1’. Then
press [Enter] again to return.
Procedure : [Enter] à [D] à [1] à [Enter]
Option 2 – Station Only
Option 2 display the
stations information and indicated beside the station MAC on whether it is
associated to an Access Point or not associated to any AP.
Procedure : [Enter] à [D] à [2] à [Enter]
Option 3 – Access Point and Station (Each in
separated view)
This option is similar to
the Airodump-NG view where Access Points & Stations information are
separated into two sections. Basically, this option is the combination of
Option 1 & 2.
Procedure : [Enter] à [D] à [3] à [Enter]
Option 5 – Display Access Points & Stations
information but without displaying of Probe name.
Option 5 is similar to
Option 4 except it will not show the SSID name probed by the station.
Procedure : [Enter] à [D] à [5] à [Enter]
Option 0 - Hiding Access Points / Stations Detail
To hide the display of
access points and stations information, simply do the same as per option 1-5
but enter [0] to hide the display.
Option 6 – Display Barchart of Detected Network
Information
User can also use option 6
to display the detected network information in barchart formatting divided into
channels, encryption type and signal range as shown below.
Procedure : [Enter] à [D] à [6] à [Enter]
Hiding /
Removing of Inactive Access Points / Stations
By default, the script will
hide those inactive access points or stations after in-active for 3 minutes and
remove from the active listing after 10 minutes. To the configuration, simply
press [Enter] and select ‘C’ for Application Configuration. Within the
Application Configuration menu, select on “T”
to configure the inactive duration before hiding the Access Point/Station.
Continue with “H” to set the waiting
time before hiding the AP/Station or press “R” to set the waiting time before removing it from the list.
Procedure : [Enter] à [C] à [T] à [R] à[Enter]
Hiding / Displaying
of Inactive Access Points / Stations
By default, the inactive
Access Points and Stations will be hidden after the specified period of time.
However, user can choose to display these inactive devices by selecting on “C” for Application Configuration and
followed by “H’. User will
subsequently have to select whether to display either Access Point / Station or
both by selecting “A” for Access
Point and “S” for Stations.
Procedure : [Enter] à [C] à [H] à [A] à[N]
Similar to view like option
4, those inactive Access Points and Stations will be grey-out and reflected the list seen time and
duration it was last seen.
Hiding of Unassociated Stations section
The [Unassociated Stations] section
contains the MAC address, signal, first/last seen, duration and OUI information
of stations that are not associated to any access point. This section may be
useful to see which are those unassociated station not participating on any
connection and could be passively sniffing the environment before attacking on
any access point.
To disable the viewing of
this section, select ‘F’ - Filter Network Display on the [Command Selection
Menu] and carry on to “S” for
Station/Client. In the Station filtering options, select “U” for unassociated
station and then enter “N” for no in displaying only if station is not
associated.
Procedure : [Enter] à [F] à [S] à [U] à[N]
Filtering
Network Display
The filtering network
display allow user to filter off the information they wanted such as only
display access point with WEP encryption, access point with WPS enabled and
much more filtration options. Below shown are examples of displaying only
Access Point with WEP encryption and WPA encryption with WPS enabled.
Procedure : [Enter] à [F] à [A] à [E] à[WEP] à[Enter]
Example of WEP Encryption
Filtering
Procedure : [Enter] à [F] à [A] à [E] à[WPA*] à[Enter] à [A] à [W] à[Y]
Example of removing all
filter and filter only WPA* with WPS enabled
Lookup MAC Address / Names
With the harvesting module run
for some time collecting all access points and stations information, user can
then lookup on all these information by simply entering the MAC address or name
wanted to lookup for. To lookup for a specific MAC address, simply select “L” on the [Command Selection Menu] and “M”
to input by MAC Address. Enter the MAC address to search and application will
return with a comprehensive detail of the specified MAC address as shown below.
Steps: [Enter] à [L] à [M] à [MAC ADDR] à[Enter]
The Lookup function also
allow user to perform wildcard search by entering “*” infront/back. Below is
example of wildcard name search.
Monitoring Of MAC Addresses / Names (Blacklist)
The application also allow
user to input MAC addresses or names to be monitored. This would be
particularly useful if user has established the specific MAC address to be
attacker MAC address. Once the MAC address / name is found in the surrounding,
it will display on screen with alert beep. To add new MAC address, enter ‘M” in the [Command Selection Menu] and then “M” for MAC address. Enter “A” to add and follows with the MAC
address.
For easier viewing, once the
monitored MAC is associated to any access point, it will be highlighted in red
on the Access Point / Client Listing.